
Learning Flutter: How to deal with the error "AVD Manager Unable to locate adb".
Android Studioで、「AVD Manager」からAndroidエミュレーターを起動しようとすると、
Unable to locate adb
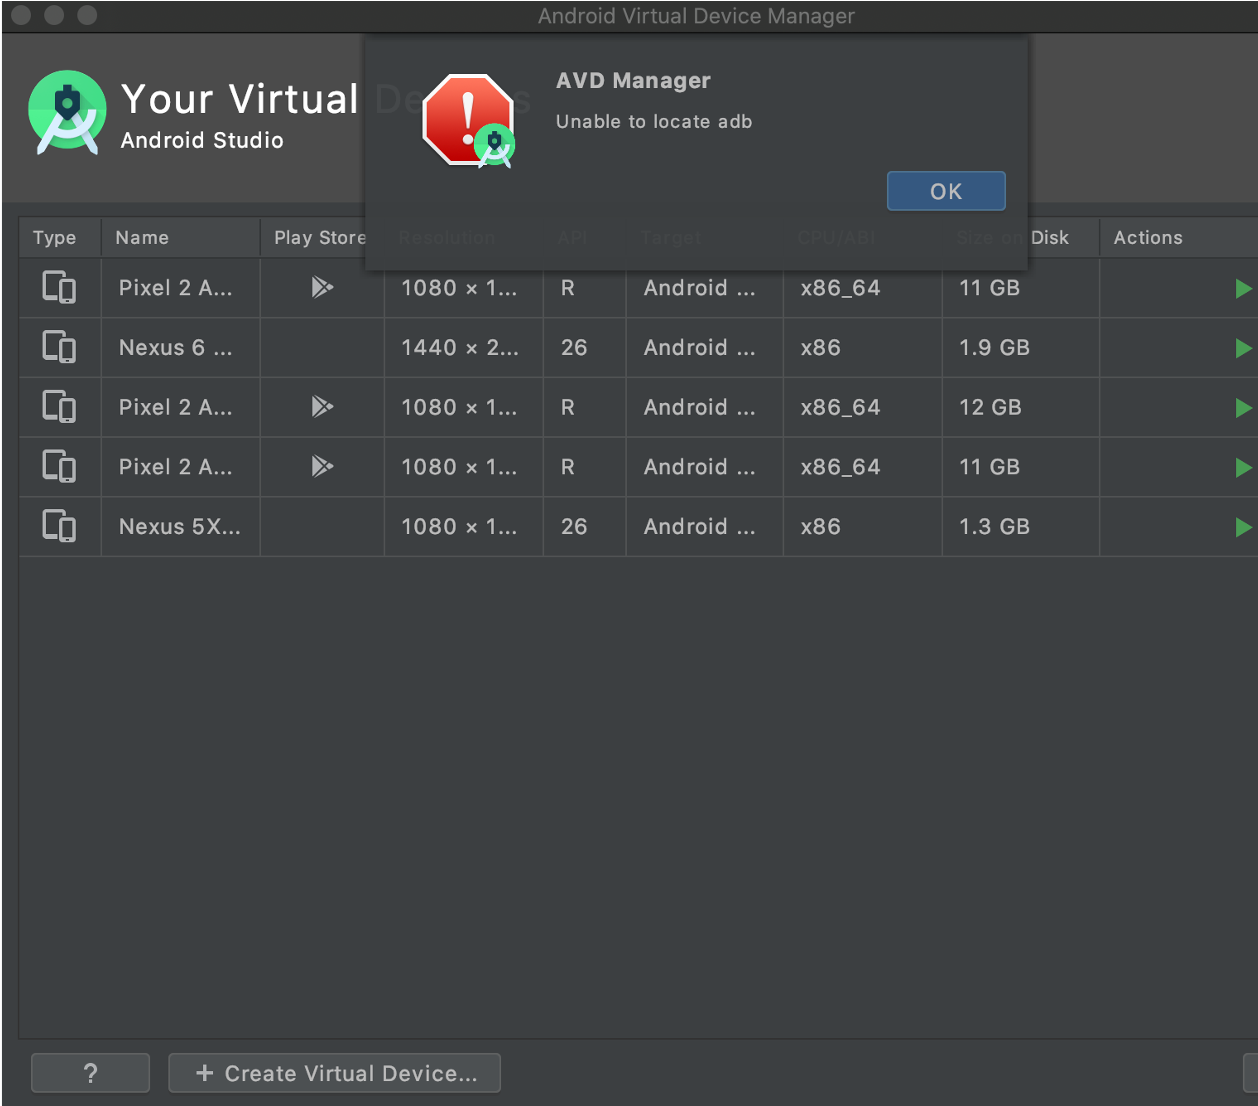
というエラーが出ることがあります。
In Android Studio, when you try to launch the Android emulator from "AVD Manager", you may get the error "Unable to locate adb".
ググってもよく分からず、解消に苦労したので、その対処法を共有したいと思います。
I had a hard time figuring it out by googling and had a hard time resolving it, so I'd like to share how I dealt with it.
結論は、
Android Studioの「Project SDK」を設定しておく
※「<No SDK>」の状態を修正する
になります。
The conclusion is as follows:
Set the "Project SDK" of Android Studio.
In other words, fix the "<No SDK>" status.
このエラーが出ても、Androidエミューレーター自体は起動できるので、実害がないことも多いのですが、気持ち悪いですよね。
Even with this error, the Android emulator itself can be started, so there is often no problem, but there is something weird about it.
また、この対処法は、後述する他の問題も一緒に解決できるので、やっておく意味はあります。
It is also worth doing this because this solution can also solve other problems that will be discussed later together.
40代からプログラミング(Flutter)を始めて、GooglePlayとAppStoreにアプリを公開しているhalzo appdevです。
作成したアプリはこちら↓ 全てFlutterで開発したアプリです。
adbとは?
What is adb?
Androidの公式サイトには、
Android Debug Bridge(adb)は、デバイスと通信するための多用途のコマンドライン ツールです。コマンドを使用すると、アプリのインストールやデバッグなど、さまざまなデバイス操作を実行できます。
(出典)Android ディベロッパー ユーザーガイド
と説明されています。
Google's web page explains it as below:
The Android Debug Bridge (adb) is a versatile command line tool for communicating with devices. The commands can be used to perform various device operations such as installing and debugging apps.
自分のざっくりした理解では、Androidの実機やエミュレーターなどの端末を、Android Studioから操作できるようにするツール、というイメージです。
My rough understanding is that it's a tool that allows you to control an actual Android device or an emulator from Android Studio.
また、言葉が紛らわしいですが、「AVD」は、「Android Virtual Device」の略で、アンドロイドの仮想端末、つまりAndroidエミュレーターのことを指しています。
Also, although the term is confusing, "AVD" stands for "Android Virtual Device," which refers to an Android virtual terminal, or Android emulator.
「AVD Manager」はそのエミュレーター(仮想端末)を、文字どおり管理するツールです。
AVD Manager is a tool to manage the emulators (virtual terminals).
エラーの意味
Meaning of the error
「Unable to locate adb」
は、直訳すると、
「adbを見つけられなかった」
ということなので、
「このままじゃ、エミュレーターなどの端末をAndroid Studioから操作できんぞ!」
ということになります。
The error message "Unable to locate adb" means "You can't control the emulator or other devices from Android Studio! "
やはり解決したいエラーですね。。
Therefore, this is a problem we want to solve.

対処法は、SDKの設定
The solution is to set up the SDK.
以下の手順で、AndroidのSDKが設定されているか、確認します。
Follow the steps below to make sure that the Android SDK is set up.
(以下、Androidエミュレーターは作成済であることを前提とし、かつMacでのご説明となる点をご了承ください。)
(Please note that the following explanation assumes that the Android emulator has already been created, and that it will be explained on a Mac.)
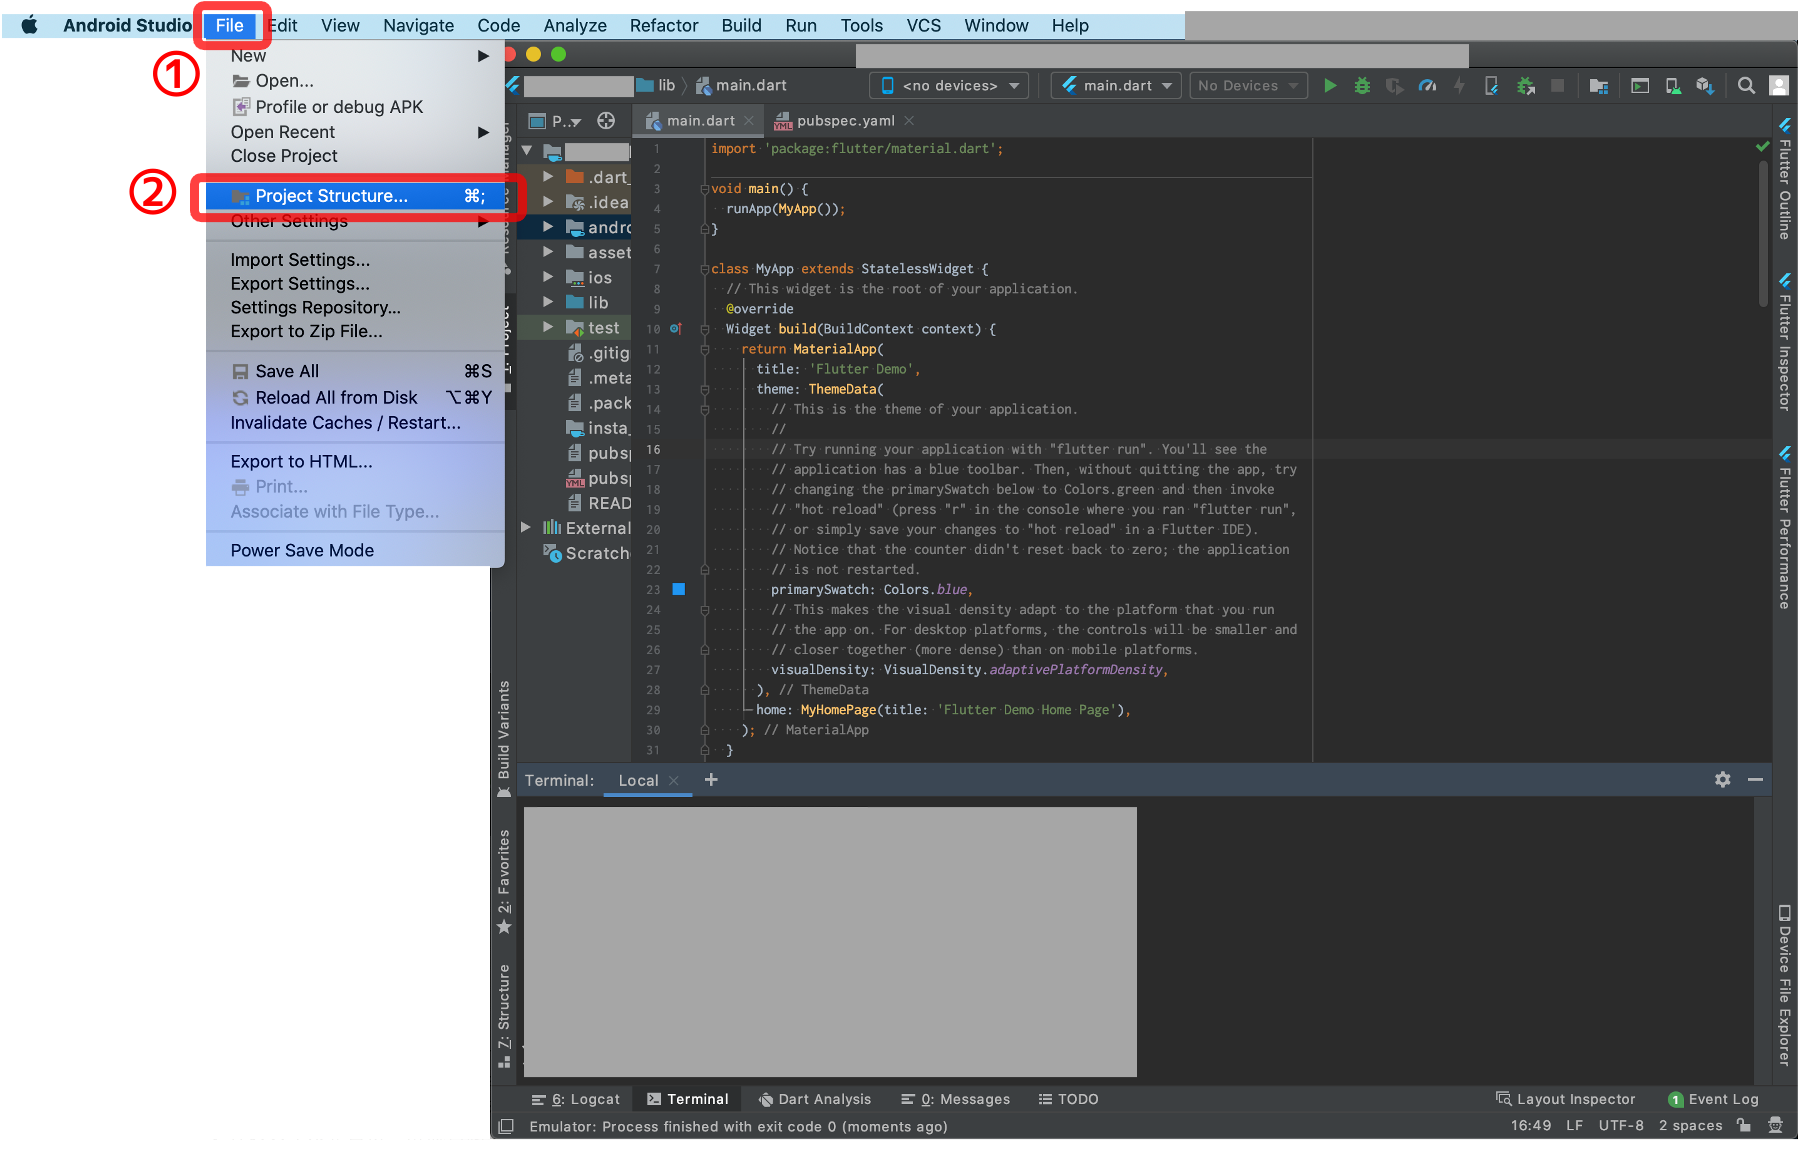
Android Studioの上部メニューバーの
In the top menu bar of Android Studio
「File」
→「Project Structure」
→出てきたウィンドウ左側の「Project」
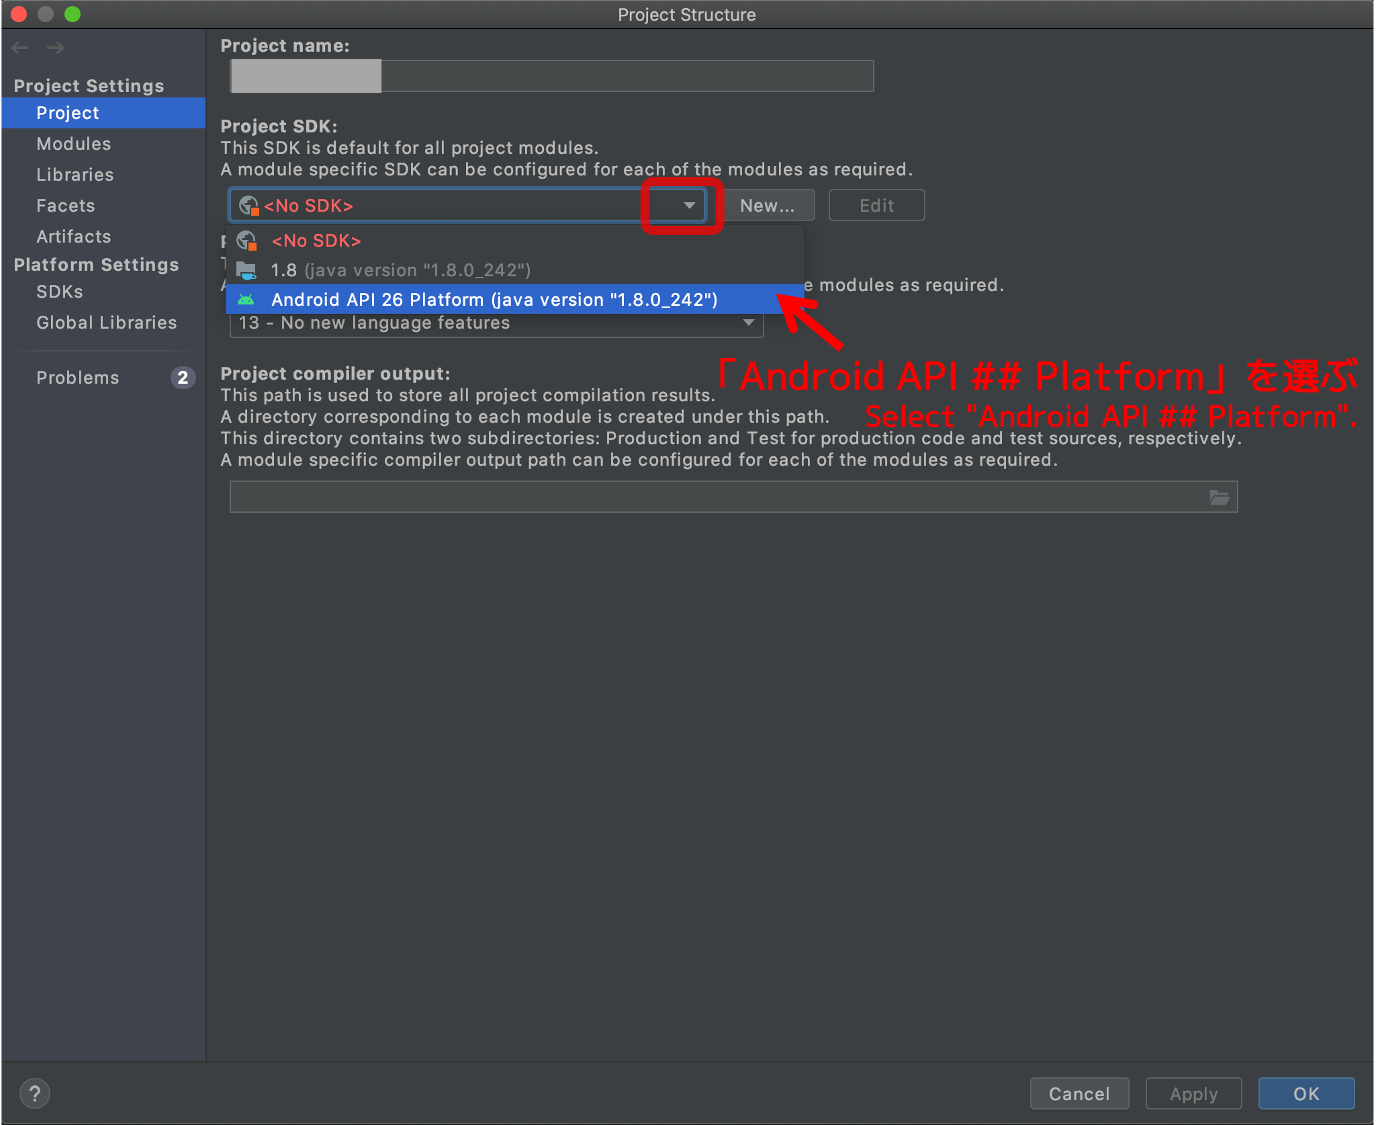
で、「Project SDK」の欄を確認します。
In the "Project" section on the left side of the window that appears, check the "Project SDK" field.
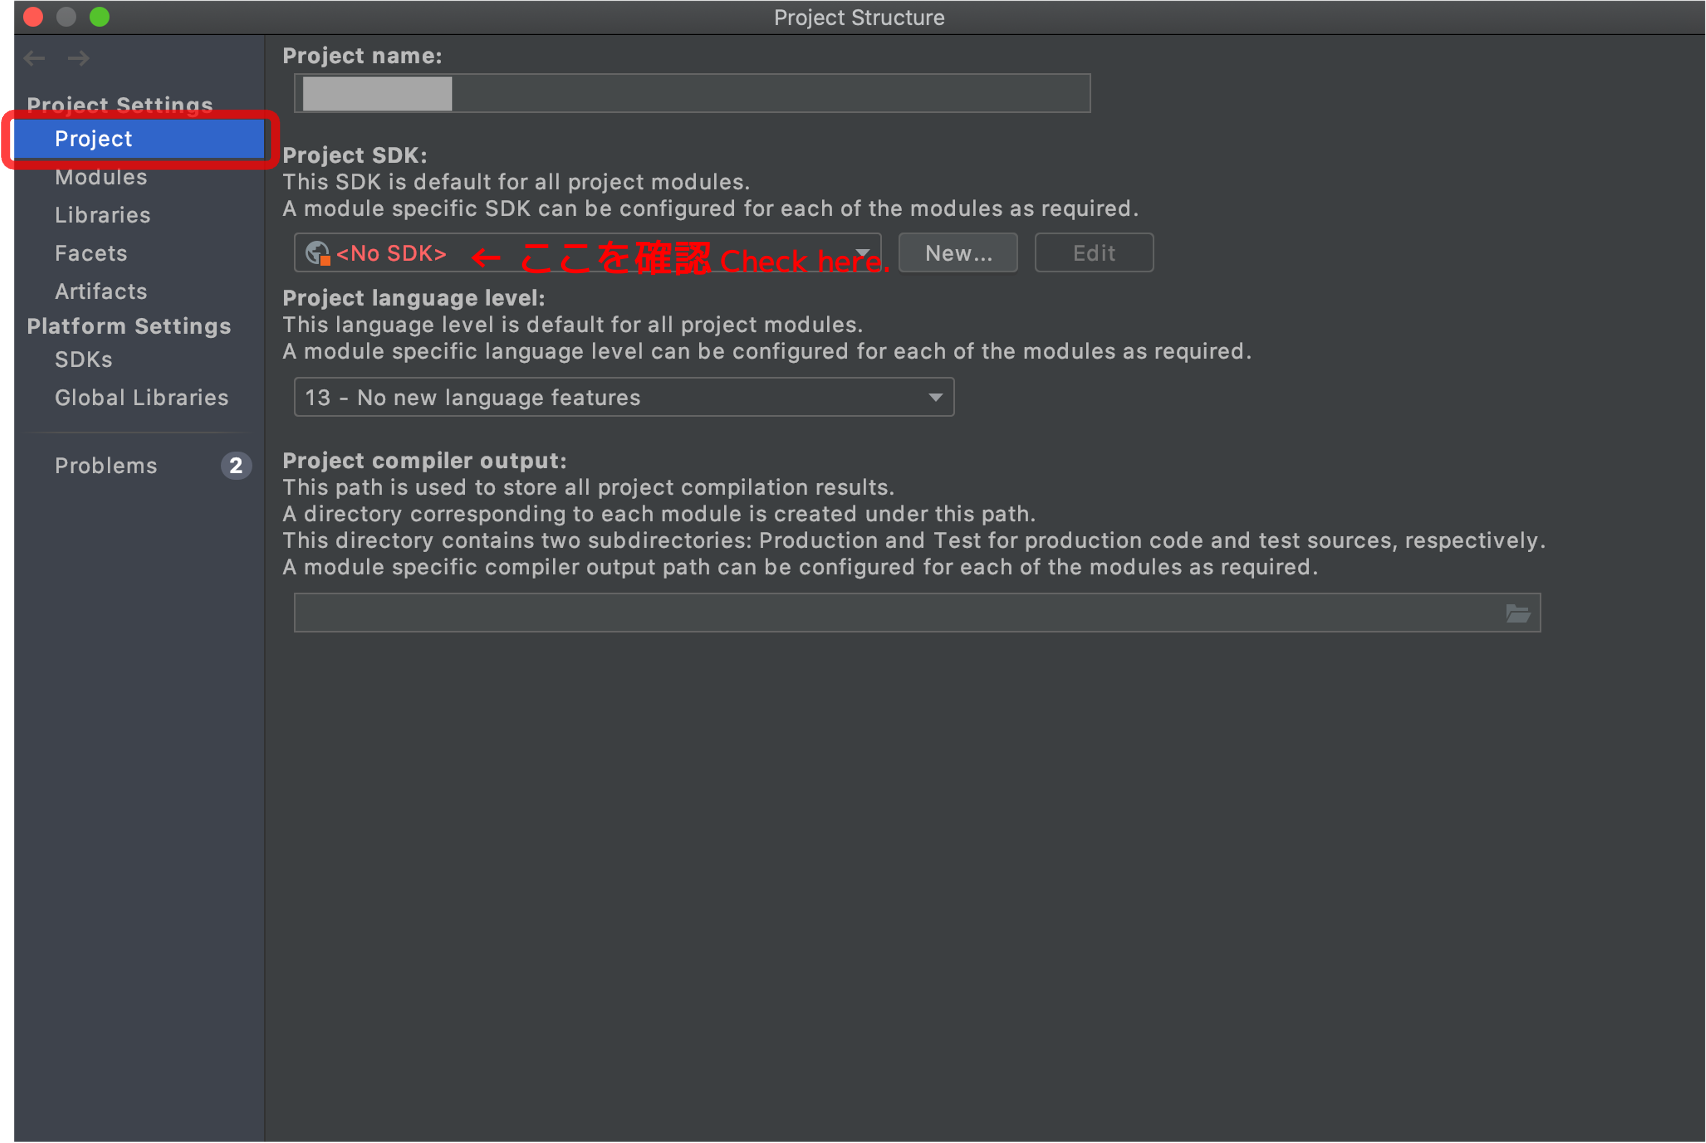
恐らく、「<No SDK>」となっていて、SDKが設定されていないので、プルダウンからSDKを選択し、決定します。
If the message "" is displayed, no SDK has been set. Therefore, select the SDK from the pull-down menu.
SDKは、
「Android API ##(番号) Platform・・・」
のような名前になっています。
The SDK is named something like "Android API ## (number) Platform…".
「SDK」とは、「Software Development Kit(ソフトウェア開発キット)」の略で、Androidアプリを開発するための基礎となるプログラムなどの一式、みたいな理解で良いと思います。
"SDK" stands for "Software Development Kit," which is a set of basic programs for developing Android applications.
前述のとおり、本記事では、エミュレーターは作成済の前提なので、リストの中に何らかのSDKは存在していると思います(エミュレーターの作成時に設定するため)。
As mentioned above, this article assumes that the emulator has already been created, so there is at least one SDK in the list (since it is set when the emulator is created).
SDKが複数ある場合は、エミュレーターのバージョンと合ったSDKを選ぶことになりますが、基本、新しいエミュレーターを起動していると思うので、「Android API」の後の番号が大きいSDKを選択すれば良いと思います。
If multiple SDKs exist in the list, you will have to choose the SDK that matches the version of the emulator.
In most cases, you will be running a newer emulator, so you should select the SDK with the larger number after "Android API".
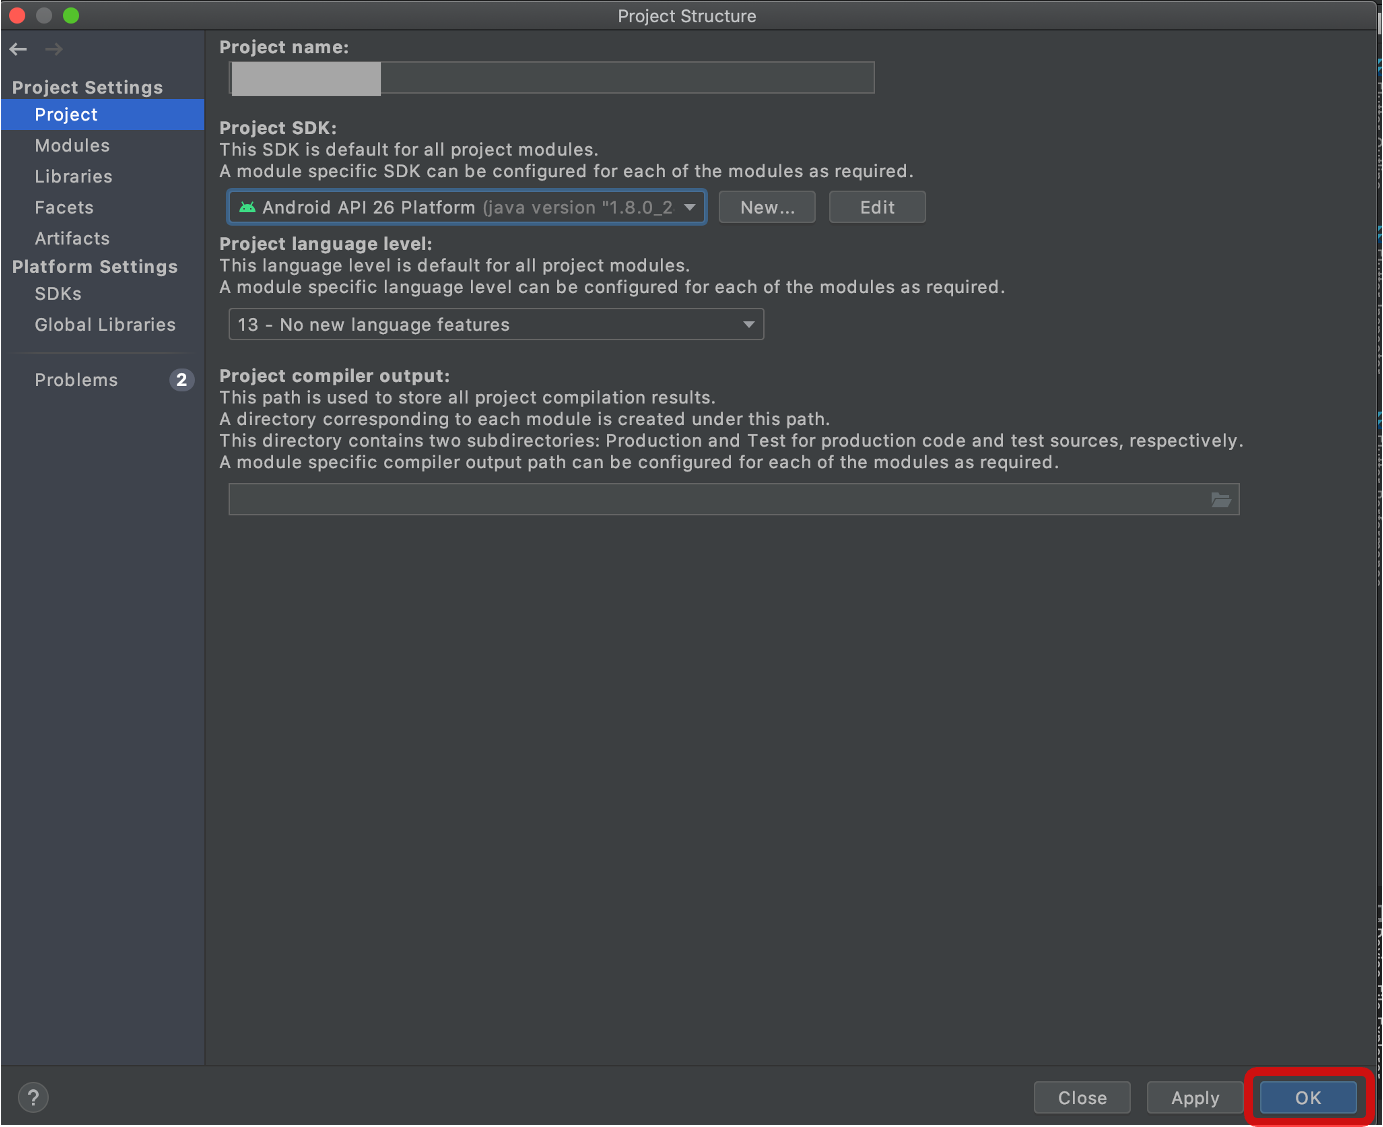
SDKを選んだら、ウィンドウ右下の「OK」を押します。
After selecting the SDK, press "OK" at the bottom right of the window.
もし、リストの中にSDKが無い、という場合は、以下の記事でSDKのインストール方法が分かりやすく説明されているので、是非ご参考にしてください。
If you don't see the SDK in the list, please refer to the following article for a clear explanation of how to install the SDK.
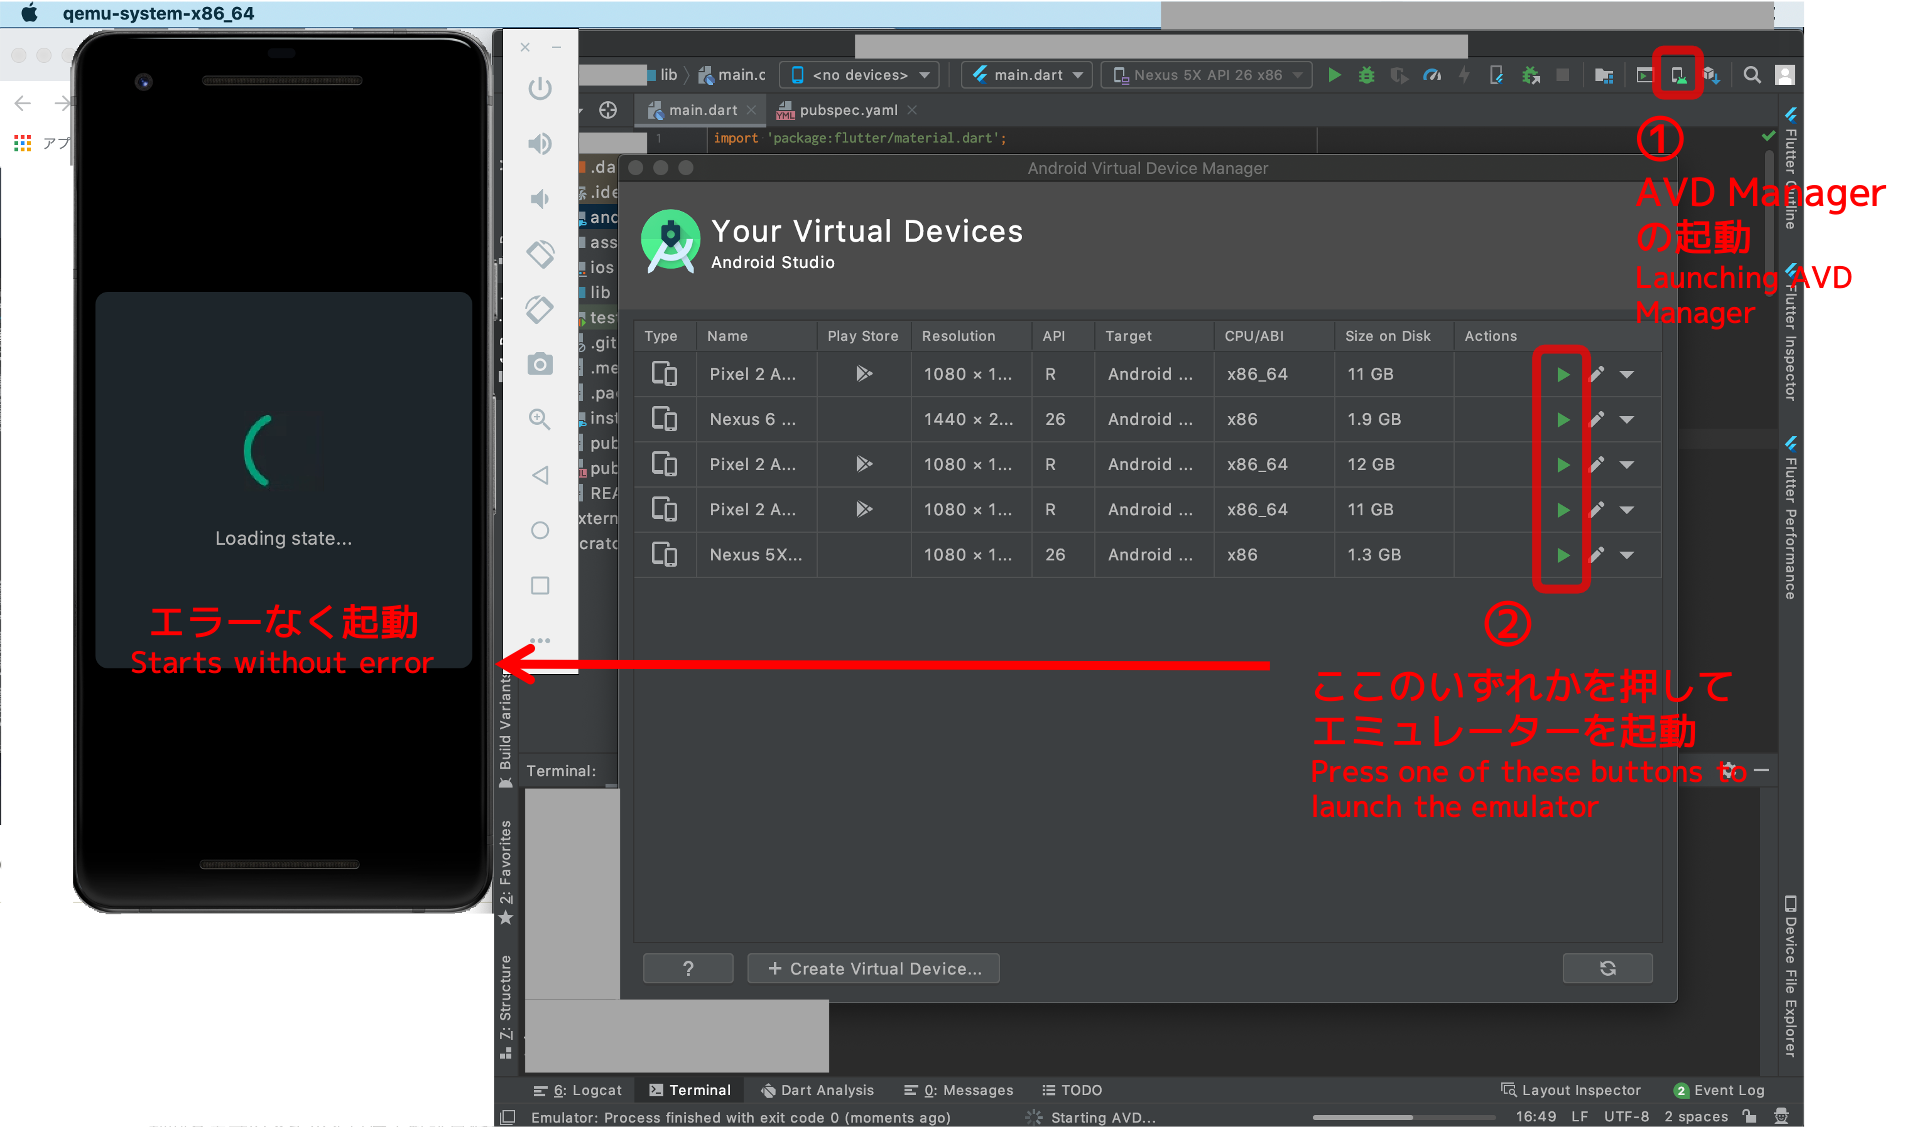
SDKの設定後、再度、AVD Managerからエミュレーターを起動すると、今度はエラーメッセージが出なくなるはずです。
After setting the SDK, start the emulator again from the AVD Manager, and the error message should not appear this time.
過去、ググって調べた際、同じエラーに対する解説は見つかるものの、やや難解な情報が多く、しばらく対応を放置していました。
In the past, when I researched, I found explanations for the same error, but the information was rather difficult to understand, so I left the response for a while.
というのも、追加でエミュレーターを作成すると解決できたからです。
Because I was able to solve the problem by creating an additional emulator.
あとで分かりましたが、これはエミュレーターの作成時に、SDKを設定するからだと思われます。
I later found out that this is probably because the SDK is set when the emulator is created.
しかし、これを繰り返すとエミュレーターが増えつづけてしまうので、抜本策を模索することとなり、試行錯誤の末、上記の対処法にたどり着きました。
However, since the number of emulators keeps increasing when this is repeated, I had to seek a drastic solution, and after trial and error, I arrived at the above method.
また、このエラーは、新規でFlutterのプロジェクトを立ち上げたときに発生すると分かりました。
I also found that this error occurs when I start a new Flutter project.
なので、新規プロジェクトでは、早い段階でSDKの設定をやっておきましょう。
So, for a new project, you should do the SDK setup early on.
「Device File Explorer」が見れないときも役立つ
It also helps when you can't see the Device File Explorer.
Android Studioには、「Device File Explorer」というタブがあり、AndroidエミュレーターやAndroid実機の中のフォルダを確認することができます。
Android Studio has a tab called "Device File Explorer", which allows you to check the folders in the Android emulator and the actual Android device.
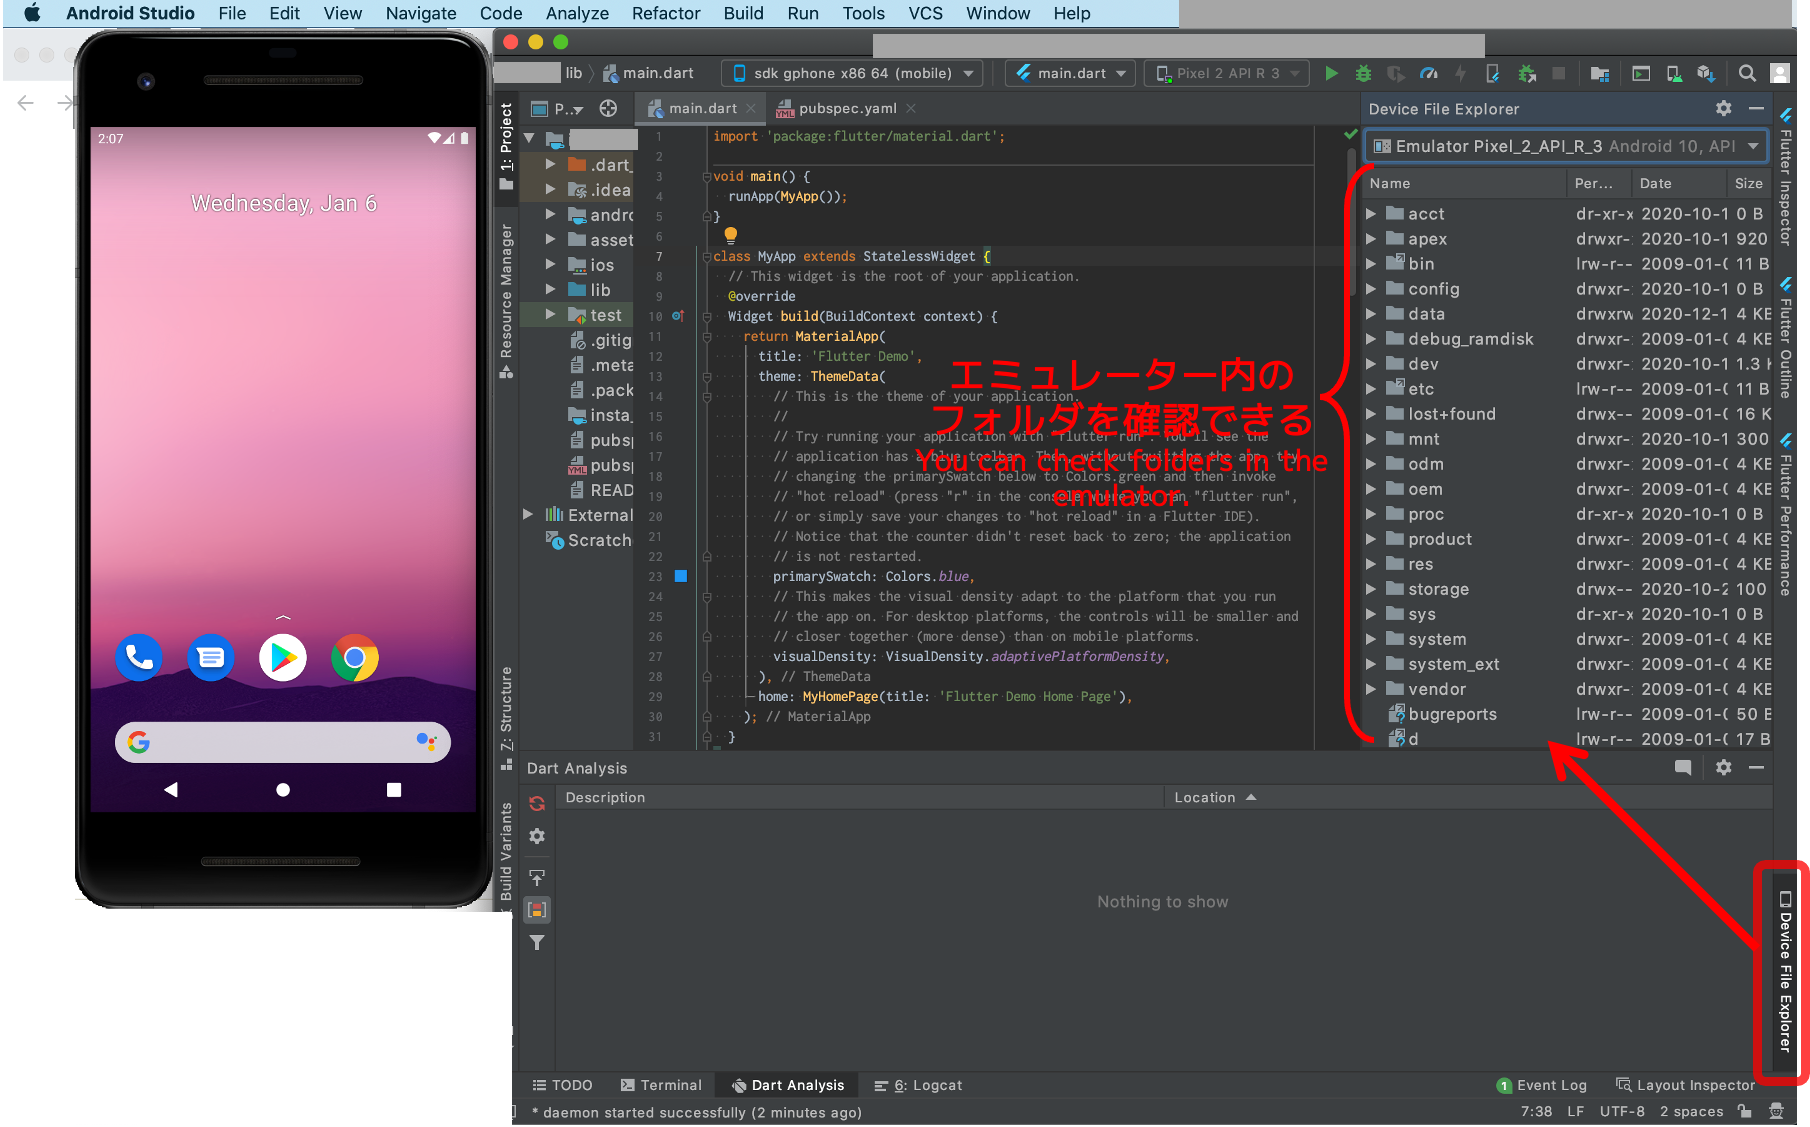
この機能は、例えばアプリを実行して、端末内に生成させたデータベースがちゃんと存在しているか、などを確認する際にとても便利です。
This feature is very useful, for example, when you run an app and want to check if the generated file exists properly in the device.
ただ、このタブを開いたとき、
Error initializing ADB: Android Debug Bridge not found.
というエラーが出て、フォルダが見れないことがあります。
However, when you open this tab, you may get an error message "Error initializing ADB: Android Debug Bridge not found." and cannot see the folder.
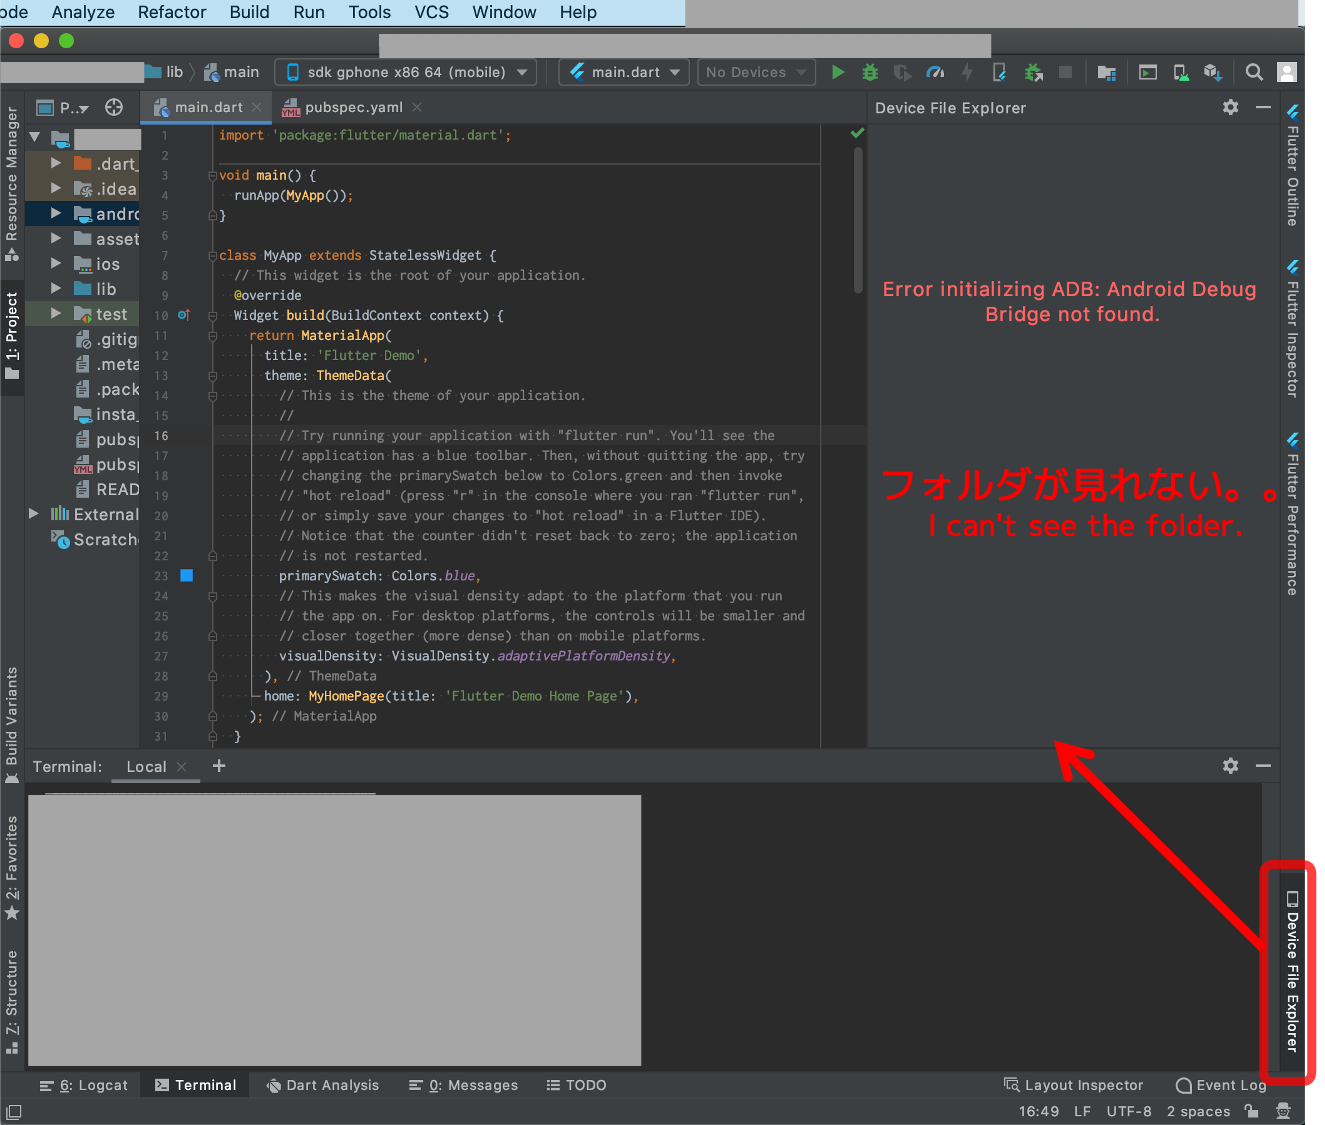
このときも、前述と同じSDKを設定する方法で解決できます。
This can also be solved by using the same method of setting up the SDK as described above.
こちらの方法は、以下の動画で詳細にご説明があるので、是非ご参考にしてください。
You can find detailed instructions on how to do this in the video below.
実は、この「Device File Explorer」に関する対処法を知ったとき、エラーメッセージが「Android Debug Bridge not found」=「ADBが見つからない」という内容だったので、もしかして「Unable to locate adb」のエラーもこれで解決するのでは?と思ったのでした。
In fact, when I found out about this "Device File Explorer" solution, the error message was "Android Debug Bridge not found" = "ADB not found", so I thought maybe the "Unable to locate adb" error could also be solved by this.
試した結果、やっぱり解決できた、というのが今回の対処法にたどり着いた経緯になります。
After trying, I was able to solve the problem, which is how I arrived at this solution.
エラーメッセージをちゃんと読む!
(英語でも頑張って読む!)
はとても重要ですね。
It's very important to read the error messages properly.
最後までお読みいただき、ありがとうございました。
Thank you for reading to the end!
個人アプリ開発で役立ったもの
おすすめの学習教材
\超初心者向けでオススメな元Udemyの講座/

\キャンペーン時を狙えば安価で網羅的な内容が学べる(日本語訳あり)/

\Gitの基礎について無料で学べる/

おすすめの学習書籍
\実用的。image_pickerに関してかなり助けられた/

\Dartの基礎文法を素早くインプットできる/


コメント