

iOSのシミュレーターで作成中のアプリを実行しようとしたら、
could not find included file 'Pods/Target Support Files/Pods-Runner/Pods-Runner.debug.xcconfig' in search paths
というエラーが出て、解決に苦労したので、ご参考に共有します。
結論(解決方法)は、以下になります(Xcodeが謎の反応を示したので、確証はなく、一部推測になります)。
- Podfileの2行目の「# platform :ios, '9.0'」の「#」を消す
※後日追記:9.0を10.0に変更する必要がある場合もあり - Terminalで、iosフォルダに移動し、「pod install」を実行する
※Podfile.lockがiosフォルダ内にある場合は削除してから実行する - Terminalで、「flutter clean」を実行する
- Terminalで、「flutter pub get」を実行する(もしくは(「flutter build ios」を実行する)
- Xcodeを再起動し、アプリを実行(Run)する
以下、発生した状況と対応を時系列で共有します。
40代からプログラミング(Flutter)を始めて、GooglePlayとAppStoreにアプリを公開しているhalzo appdevです。
作成したアプリはこちら↓ 全てFlutterで開発したアプリです。
iOSのシミュレーターで実行しようとしたらエラー発生
Androidのエミュレーターでは問題なく動作したのですが、iOSのシミュレーターで実行(デバッグモード)しようとしたところ、Xcode上で以下のエラーが出ました。
/Users/##########/FlutterProjects/#######/ios/Flutter/Debug.xcconfig:1: could not find included file 'Pods/Target Support Files/Pods-Runner/Pods-Runner.debug.xcconfig' in search paths
Xcodeのエラー画面は以下のとおりです。
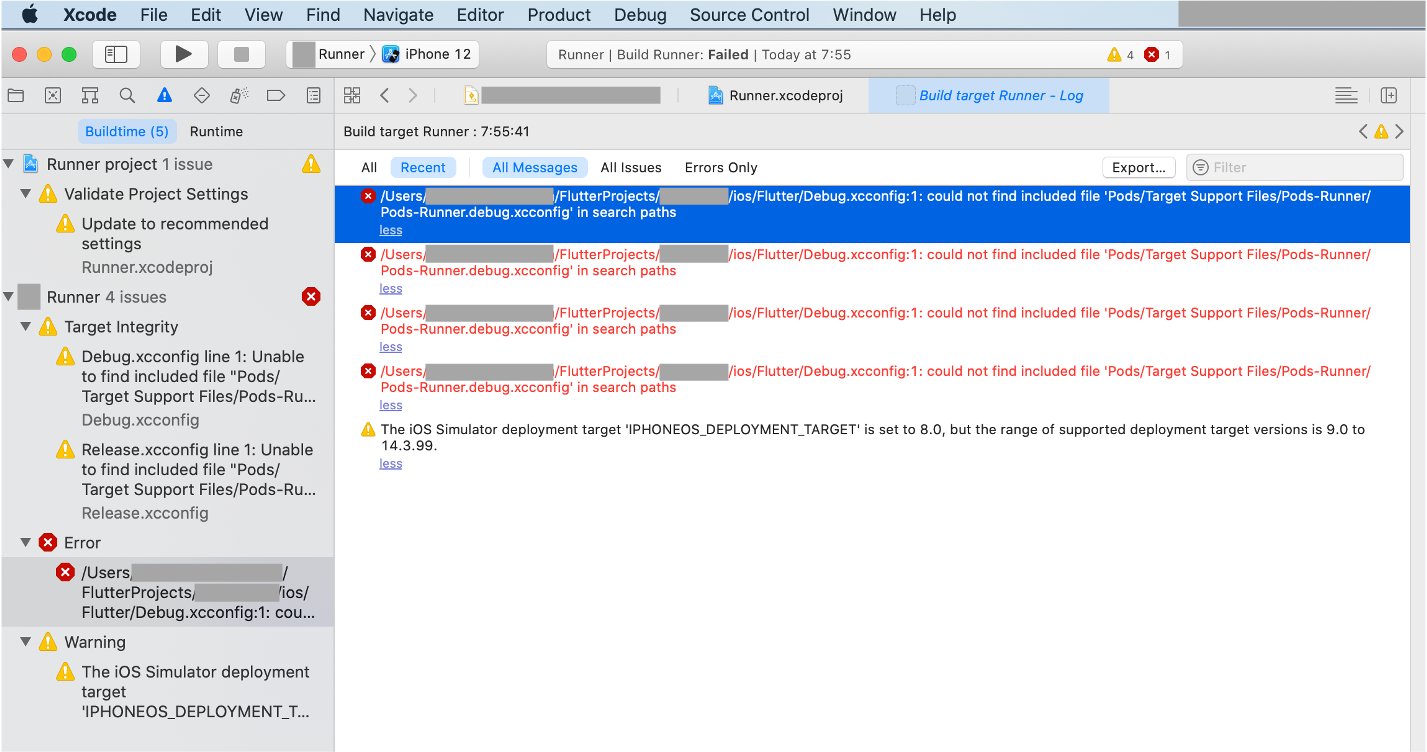
最初の赤文字の文4つは同じエラーメッセージです。
「could not find included file 'Pods」のキーワードでググってみると、以下の記事に、iosフォルダに移動してTerminalから「pod install」すると良い、とあったのでやってみました。
なお、Podfile.lockを削除するという情報もありましたが、自分のiosフォルダにはPodfile.lockはありませんでした。
また、「path_provider: 1.6.1」を「pubspec.yaml」ファイルに追記する、という方法も書かれていましたが、私は試しませんでした。
なお、PodfileやPodfile.lockについての詳しい説明は、以下の記事が参考になります。

pod installが実行できずエラー → Podfileを修正
上記のとおりpod installをしたのですが、成功せず、Terminalに以下のようなエラーが出ました。
[!] CocoaPods could not find compatible versions for pod "sqflite":
In Podfile:
sqflite (from `.symlinks/plugins/sqflite/ios`)
Specs satisfying the `sqflite (from `.symlinks/plugins/sqflite/ios`)` dependency were found, but they required a higher minimum deployment target.
[!] `<PBXGroup UUID=`###########`>` attempted to initialize an object with an unknown UUID. `###########` for attribute: `children`. This can be the result of a merge and the unknown UUID is being discarded.
[!] Automatically assigning platform `iOS` with version `8.0` on target `Runner` because no platform was specified. Please specify a platform for this target in your Podfile. See `https://guides.cocoapods.org/syntax/podfile.html#platform`.
Terminalの画面(Android Studio内)は以下のとおりです。
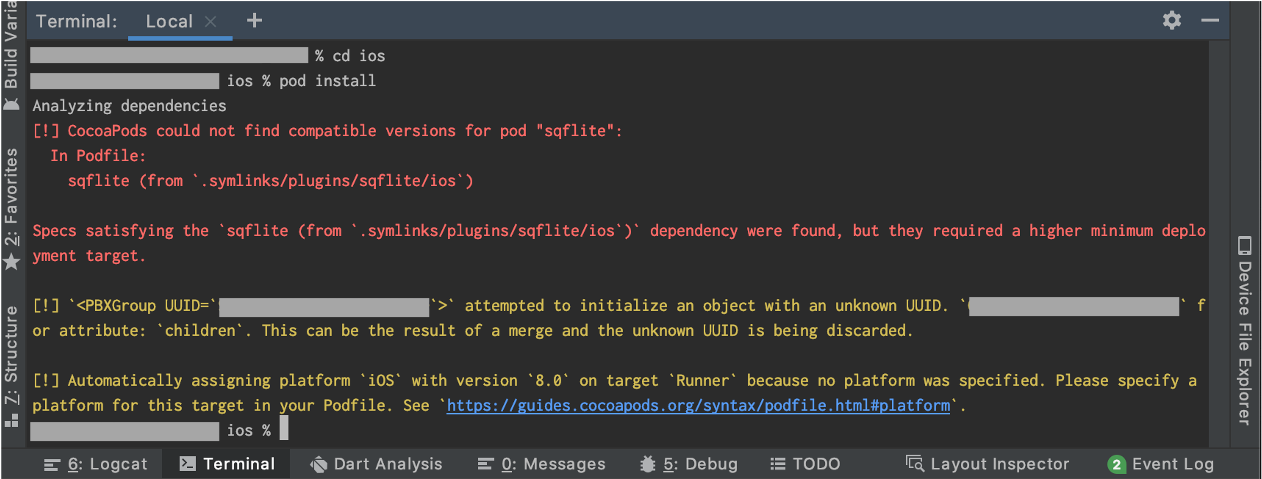
なぜここで「sqflite」の話が出てくるか分からなかったので、「Automatically assigning platform 'iOS' with version '8.0' on target 'Runner'」の方でググりました。
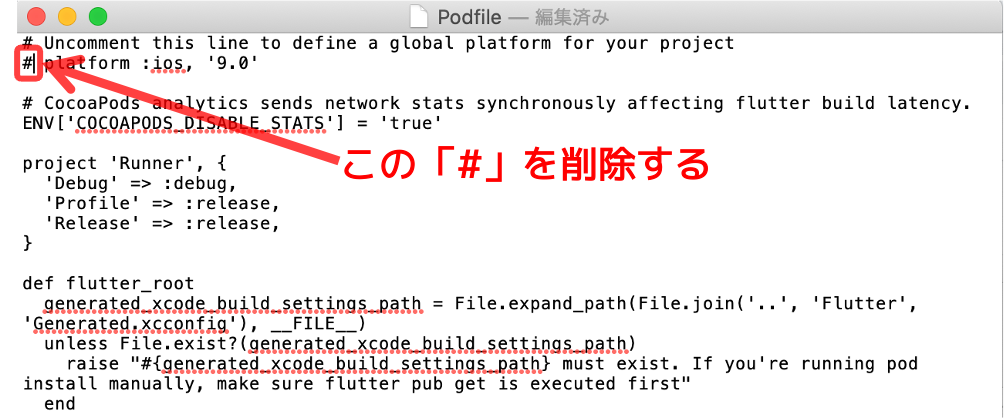
すると以下の記事に、Podfileの2行目にある
「# platform :ios, '9.0'」
の「#」を削除すると良い、と書かれていたのでやってみました。

後日追記:
後日、上記に加えて、この「9.0」を「10.0」に修正しないといけない場面がありました。
具体的には、Cloud Firestore(Firebaseのデータベース機能)のパッケージのバージョンを「^0.16.0」以上にしたとき、「9.0」のままだとエラーが解消せず、「10.0」にしたら解消しました。
参考にさせていただいたのは下記情報になります。

pod install成功 → Xcodeで依然エラー
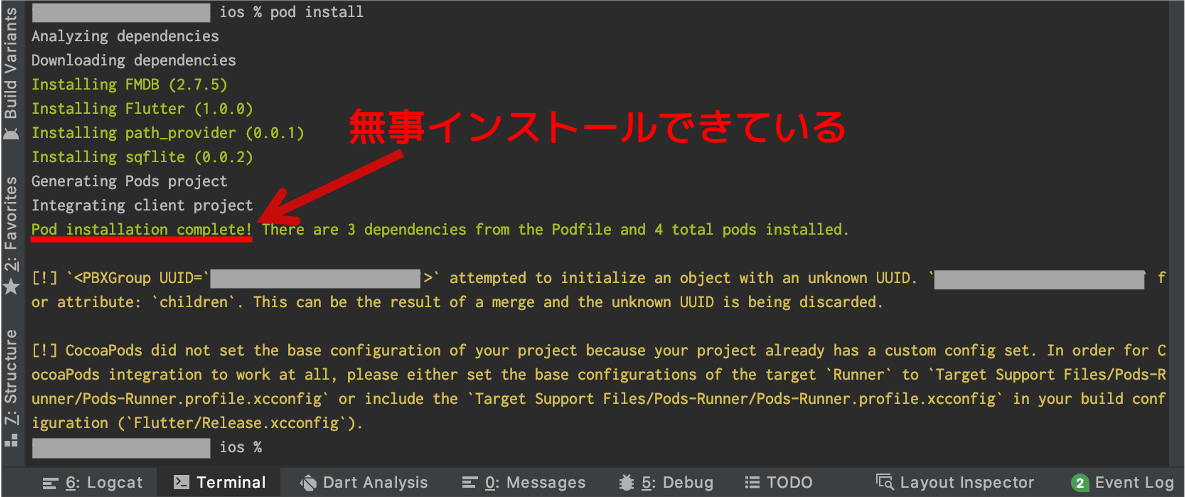
上記のPodfile修正のあと、改めて「pod install」をすると、Terminalに下記メッセージは出ましたが、赤字のメッセージは出ず、無事、インストールできました。
Analyzing dependencies
Downloading dependencies
Installing FMDB (2.7.5)
Installing Flutter (1.0.0)
Installing path_provider (0.0.1)
Installing sqflite (0.0.2)
Generating Pods project
Integrating client project
Pod installation complete! There are 3 dependencies from the Podfile and 4 total pods installed.
[!] `<PBXGroup UUID=`#######`>` attempted to initialize an object with an unknown UUID. `#######` for attribute: `children`. This can be the result of a merge and the unknown UUID is being discarded.
[!] CocoaPods did not set the base configuration of your project because your project already has a custom config set. In order for CocoaPods integration to work at all, please either set the base configurations of the target `Runner` to `Target Support Files/Pods-Runner/Pods-Runner.profile.xcconfig` or include the `Target Support Files/Pods-Runner/Pods-Runner.profile.xcconfig` in your build configuration (`Flutter/Release.xcconfig`).
Terminalの画面(Android Studio内)は以下のとおりです。
この段階でiosフォルダには、「Podfile.lock」が生成されました。
そこで、「flutter clean」をしたあとに、再度、Xcode上でアプリをRunしたところ、今度は以下のようなエラーが出て、実行できませんでした。
/Users/######/FlutterProjects/#######/ios/Flutter/Debug.xcconfig:2: could not find included file 'Generated.xcconfig' in search paths
/Users/######/FlutterProjects/#######/ios/Flutter/Debug.xcconfig:2: could not find included file 'Generated.xcconfig' in search paths
/Users/######/FlutterProjects/#######/ios/Flutter/Debug.xcconfig:2: could not find included file 'Generated.xcconfig' in search paths
/Users/######/FlutterProjects/#######/ios/Flutter/Debug.xcconfig:2: could not find included file 'Generated.xcconfig' in search paths
The iOS Simulator deployment target 'IPHONEOS_DEPLOYMENT_TARGET' is set to 8.0, but the range of supported deployment target versions is 9.0 to 14.3.99.
Xcode上の画面は以下のとおりです。
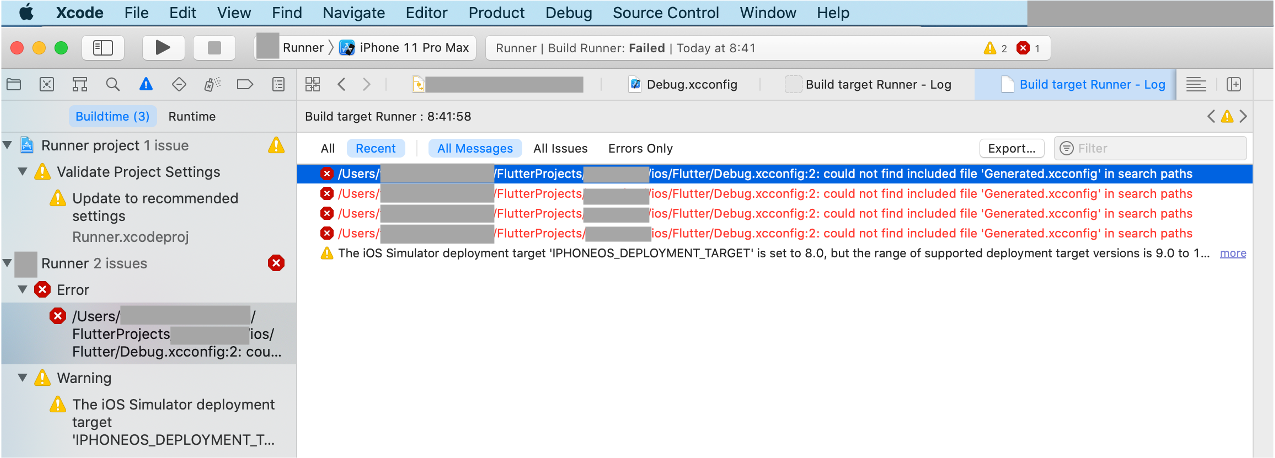
'Generated.xcconfig'というファイルが見つからない、ということのようです。
そこで「Podfile.lock」を削除して、もう一度「pod install」をやってみたのですが、今度はTerminalに以下のエラーが出ました。
[!] Invalid `Podfile` file: /Users/######/FlutterProjects/#######/ios/Flutter/Generated.xcconfig must exist. If you're running pod install manually, make sure flutter pub get is executed first.
# from /Users/#######/FlutterProjects/#######/ios/Podfile:16
# -------------------------------------------
# unless File.exist?(generated_xcode_build_settings_path)
> raise "#{generated_xcode_build_settings_path} must exist. If you're running pod install manually, make sure flutter pub get is executed first"
# end
# -------------------------------------------
Xcode上のエラーと同じく、'Generated.xcconfig'というファイルが見つからない、ということみたいです。
ただ、後で気づいたのですが、エラーメッセージ冒頭に、「手動でpod installをした場合は、flutter pub getをしなさい」とあり、本来はこれをやるべきだったのかもしれません。
Xcodeで「Clean Build Folder」、Terminalで「flutter build ios」などを実行
「pub get」のことは気づかず、「Generated.xcconfig」のエラーでググると、以下の記事にいくつか情報がありました。

まず、記事の情報に従って、
- Terminalで、「flutter clean」と「flutter build」を実行した後、
- Xcodeで、上部メニューバーの「Product」から「Clean Build Folder」を実行、次に同じく「Product」から「Build」を実行する
をやってみました。
しかし、Xcodeでは前と同じエラーが出ました。
そこで、もう一つ書かれていたTerminalから「flutter build ios」を実行する、というのをやってみました。
すると、今度はTerminalに以下のメッセージが出て、結局ビルドが通りませんでした。
Running "flutter pub get" in #######... 2.0s
Building com.example.####### for device (ios-release)...
Signing iOS app for device deployment using developer identity: "Apple Development: #######@icloud.com (#######)"
Running pod install... 8.0s
Running Xcode build...
Xcode build done. 30.3s
Failed to build iOS app
Error output from Xcode build:
↳
** BUILD FAILED **
Xcode's output:
↳
note: Using new build system
note: Building targets in parallel
note: Planning build
note: Constructing build description
warning: The iOS deployment target 'IPHONEOS_DEPLOYMENT_TARGET' is set to 4.3, but the range of supported deployment target
versions is 9.0 to 14.3.99. (in target 'FMDB' from project 'Pods')
warning: The iOS deployment target 'IPHONEOS_DEPLOYMENT_TARGET' is set to 8.0, but the range of supported deployment target
versions is 9.0 to 14.3.99. (in target 'Flutter' from project 'Pods')
warning: The iOS deployment target 'IPHONEOS_DEPLOYMENT_TARGET' is set to 8.0, but the range of supported deployment target
versions is 9.0 to 14.3.99. (in target 'path_provider' from project 'Pods')
error: Failed to register bundle identifier: The app identifier "com.example.#######" cannot be registered to your development team because it is not available. Change your bundle identifier to a unique string to try again. (in target 'Runner' from project 'Runner')
error: No profiles for 'com.example.#######' were found: Xcode couldn't find any iOS App Development provisioning profiles
matching 'com.example.#######'. (in target 'Runner' from project 'Runner')
warning: The iOS deployment target 'IPHONEOS_DEPLOYMENT_TARGET' is set to 8.0, but the range of supported deployment target
versions is 9.0 to 14.3.99. (in target 'Runner' from project 'Runner')
It appears that your application still contains the default signing identifier.
Try replacing 'com.example' with your signing id in Xcode:
open ios/Runner.xcworkspace
Encountered error while building for device.
内容を見ると、iOS実機でよく出る「bundle identifier」のエラーと似たメッセージが出ています。
※ご参考ですが、iOS実機エラーの対処法については以下の記事に掲載しています。

ダメ元でXcodeを再起動して実行したらできた。。
ここで、ダメ元で、Xcodeを再起動し、改めてアプリをRunしたところ、なぜか問題なくアプリが動作しました。
なかなか謎です。。
まとめ(有効だったと思う対策)
どれが有効な対策だったのか、判断が難しいのですが、
- 2回目の「pod install」のときに「flutter pub get」を実行せよ、というメッセージが出ていたこと
- 「flutter build ios」実行後の最初のメッセージに、「Running "flutter pub get" in」という表示があること(つまり、このときに「flutter pub get」が一緒に実行された)
から、「flutter pub get」は早い段階でやるべきだったのだろうと思いました。
以下、改めて有効と思われる対策のまとめになります。
- Podfileの2行目の「# platform :ios, '9.0'」の「#」を消す
※後日追記:9.0を10.0に変更する必要がある場合もあり - Terminalで、iosフォルダに移動し、「pod install」を実行する
※Podfile.lockがiosフォルダ内にある場合は削除してから実行する - Terminalで、「flutter clean」を実行する
- Terminalで、「flutter pub get」を実行する(「flutter build ios」の実行でも行われる)
- Xcodeを再起動し、アプリを実行(Run)する
相変わらずXcode、なかなか扱いが難しいです。
最後までお読みいただき、ありがとうございました。
個人アプリ開発で役立ったもの
おすすめの学習教材
\超初心者向けでオススメな元Udemyの講座/

\キャンペーン時を狙えば安価で網羅的な内容が学べる(日本語訳あり)/

\Gitの基礎について無料で学べる/

おすすめの学習書籍
\実用的。image_pickerに関してかなり助けられた/

\Dartの基礎文法を素早くインプットできる/

コメント